Easy Small-Batch Focaccia Recipe (No-Knead!)
This post may contain affiliate links and/or codes. You won't pay anything extra, but I might make a commission.
Latest Post: How to Be a Good Dinner Party Guest


You can have warm, chewy, delicious focaccia bread in as little as two hours (seriously, no tricks, two hours from right now) with my quick and easy focaccia recipe! There's no special equipment involved, one batch is enough for two or three people, and best of all, no kneading!!

What is focaccia?
Deliciousness in a pan? Heaven on a plate? Breakfast?
You probably want more of a definition than that. :-)
Focaccia is a flat Italian bread with big dimples all over the top. It's made with a very wet and sticky dough (called a high-hydration dough, if you want to talk like professional bread bakers), which makes a bubbly, chewy interior and a crispy crust.
My recipe does not use a stand mixer, and does not involve any kneading. After mixing the ingredients together with your hand, most of the time is just waiting for it to rise a couple of times and bake.
You do have a few options that will add some time, or you can keep it incredibly simple, and get delicious homemade bread into your mouth faster.

There are focaccia recipes that take a lot longer and give the bread bigger air bubbles. For example, when I'm not in a hurry I make Samin Nosrat's Ligurian Focaccia, which takes about 16 hours (and is totally worth it, if you have the time).
But if you don't want to wait until the next day to eat, my easy focaccia bread is the way to go.
How much does this recipe make?
This recipe is designed to make a small batch of focaccia, in an 8- or 9-inch cake pan, square or round. You can double the recipe, triple it, quadruple it, or more, but then you should be dividing the dough and baking it up in smaller pans-this recipe is best for small pans, like if you want to let different people decorate their own focaccia, or you want to give them away to different people as gifts, or you want to freeze them so that you always have focaccia ready!
I've done as many as five batches at once. You're only limited by the size of your mixing bowl, the number of pans you have, and how many will fit reasonably well in your oven at one time.
You can also make a bunch, get them all ready to go into the oven, and then hold some in the refrigerator until the oven is free.
Can I make a big batch of this in one big pan?
There are better recipes if you want to make one giant pan of focaccia. To make a big baking sheet of focaccia, as most other focaccia recipes do, the dough needs more structure-more manipulation and/or a longer, cooler first rise. The only reason this recipe is so quick is that it's baked in a small pan.
Ingredients

The basic dough needs only six ingredients: flour, yeast, salt, water, honey, and olive oil. Then there some optional herbs and decorations.
Which kind of flour is best?
In the recipe I give you the option of using either bread flour or all-purpose flour. So which one is better?
Really, it just depends on how you like your bread (or which flour you have on hand). Regular flour will give you a slightly softer bread, and bread flour will give you a slightly chewier bread. Both will be nice and crispy on the outside. Honestly, I don't know which one I prefer. Unless I'm eating them together, I can't even swear that I can tell.
If you do decide to use bread flour though, you should add a little extra water, since bread flour absorbs more liquid than regular flour (don't worry, it's all in the recipe!).
But whichever flour you use, make sure you're measuring it correctly. Weighing it is the foolproof way (I have this scale), but if you don't have a kitchen scale, gently spoon the flour into your measuring cup until it's over the rim, then sweep the extra off with the straight edge of a knife.
If you just dig your measuring cup into the flour, you're going to compress the flour and end up with way more than the recipe calls for.
Which kind of yeast should I use?
This works equally as well with both instant yeast and active dry yeast, although instant yeast will rise a little faster, plus you don't have to mix it with water first and get it bubbly, since instant yeast can just be mixed in with the other dry ingredients.
Other than speed, though, there's really no advantage to using instant yeast, so don't buy it especially for this.
Do I really need flaky sea salt?
I know, I know. You already have one or two kinds of salt, and you don't want to buy yet another kind. I hear you. (I mean, I currently have six, but I have issues.)
And of course you don't have to go out and get flaky sea salt.
But you should.
Flaky sea salt is a wonderful ingredient to have on hand. It's a finishing salt, meaning that you sprinkle a bit onto foods after they're done cooking or baking, so you don't need much. Buy some now, and you'll have it for a looooong time.
I sprinkle it on focaccia, chocolate chip cookies, chocolate ice cream, pie, brownies (seeing a pattern here?), salad, avocados, and more things that I'm forgetting at the moment. The big flakes stay intact, and coming across one while eating gives you a burst of briny goodness.
Maldon is a very popular, inexpensive brand. If you want to get a little fancier, Saltverk is harvested by hand in Iceland.
How warm is lukewarm water?
If you have an instant-read thermometer, lukewarm water should be roughly 105°-110°F. You don't need to measure it every time though, after a few times you'll get a sense of how warm it should be by touch.
You shouldn't get an instant-read thermometer just for this, because I'm going to tell you how to estimate it. But if you want to bake more kinds of bread, it will come in handy. I have this one. And this one. And this one, which is the most expensive, but also the most versatile.
And if you don't have an instant-read thermometer?
Run the water in your sink until it gets very warm (not hot-if it's hot enough to hurt you, it will definitely kill your yeast!). You should be able to hold your finger in the water indefinitely, but it should be close to being too warm to be comfortable.

Honey
I could tell you that I like the taste of honey in this recipe, but if I did a blind taste test I might fail. I *think* I like the taste of honey more. But there's so little, I don't think it matters. I've just always used honey.
If you don't have a teaspoon of honey, substitute 1.5 teaspoons of granulated sugar.
Olive Oil
Anybody ever tell you that you should only use good olive oil once the cooking is all done? That using good olive oil in baking is a waste of money?
Those people are wrong.
Don't believe me? I'm not going to argue, I'm simply going to ask you to do an experiment: make this recipe with some good olive oil, and then with some cheap olive oil, and see if you can taste the difference. Both should be extra-virgin.
Honestly, in some recipes it won't matter a bit. But in something like focaccia or Baked Feta Pasta, where the olive oil is responsible for so much of the flavor, you'll probably notice. If you do, then it's up to you if you want to use the good stuff.
You could also split the difference, using cheaper olive oil in the dough and to grease the pan, then using more expensive stuff to pour over the top of the dough, both before baking and after.
Herbs
You don't have to flavor the dough with any herbs, the bread will have an absolutely delicious flavor on its own. But you can add dried or fresh herbs, and make the focaccia even tastier.
Fresh rosemary focaccia is a favorite of mine, and sometimes I add thyme as well (even though it's my least-favorite herb to deal with). You can also use dried herbs, but as with just about everything, there will be a difference in flavor if you use dried herbs. However, they're so much easier, and this is supposed to be a quick and hassle-free recipe, so I usually use dried.
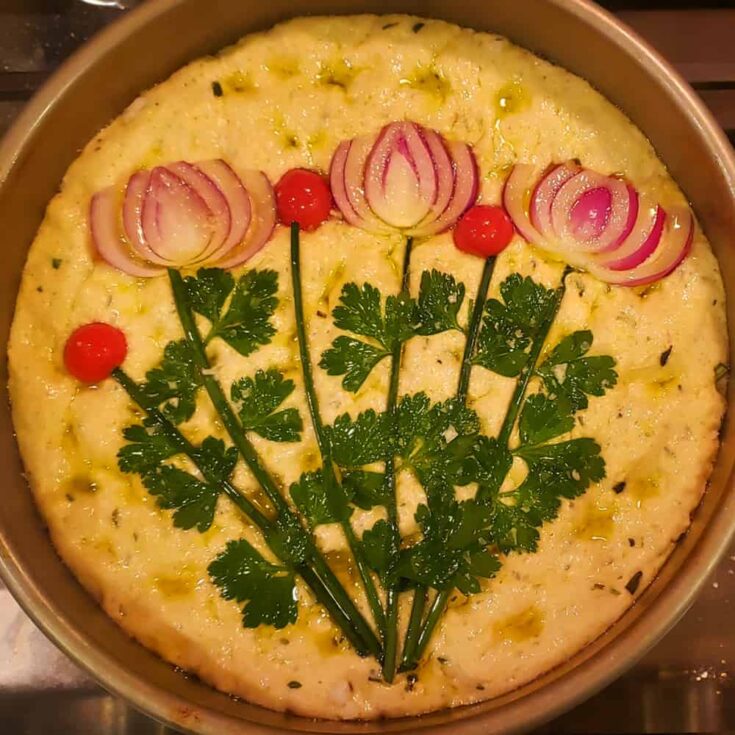
Decorating your focaccia

Decorating your focaccia is completely optional (and adds a good bit of time), but you can create an edible work of art!
You can also make a big batch of focaccia dough and divide it into smaller pans, like I did last week when my extended family was visiting, and everybody can decorate their own! It's a really fun family activity.
Whichever focaccia toppings you use, make sure you rub some olive oil on them so that they don't burn.
Decorating with herbs
Herbs make pretty-and tasty-decorations for focaccia. Only use the stems if they're stems that you would normally use in a recipe. Otherwise, use the leaves only.
Decorating with vegetables
If you can put a vegetable in the oven, you can bake it on top of your focaccia. The more colorful, the better!
Make sure that you cut the vegetables thin enough so that they'll cook through in the 25-35 minutes that they'll be in the oven.
Grape and cherry tomatoes work especially well, and look so pretty! I usually cut them in half.
Flowers are a very easy design to make on your dough, and chives and scallions make great stems.
Other vegetables I've used are bell peppers, zucchini, squash, olives, and shallots.

Why the dimples?
One of the signature features of focaccia is its dimpled top, made by pressing your fingers deep into the dough, making hills and valleys. But why?
The dimples do two things. One, they give olive oil a place to pool. Before baking, olive oil is poured on top of the dough. Without the dimples, most of the olive oil would run off onto the sides as the bread rose in the oven, and disappear under the dough.
But when the olive oil sits in the dimples, it gets absorbed into the dough, making it unbelievably delicious, with the kind of mouthfeel that you can only get from a food with a good amount of fat.
The dimples also keep the dough from rising up into a dome, which bread has a tendency to do when left to its own devices.
That's it, now you're only two hours away from delicious homemade focaccia bread!
Recipe Card
Quick & Easy Focaccia Recipe
This is the fastest, simplest bread you can make, and it will taste like you worked on it all day!
Ingredients
- 1¼ cups (150 grams) all-purpose or bread flour
- 1¼ teaspoons instant or active dry yeast
- 1 teaspoon Diamond Crystal Kosher Salt, or ⅔ teaspoon Morton's Kosher Salt, or ½ teaspoon table salt
- ½ cup lukewarm water (about 105°F), plus 2 teaspoons extra if using bread flour
- 6 tablespoons good olive oil, preferably extra virgin, divided
- 1 teaspoon honey
- 1½ teaspoons chopped fresh rosemary leaves OR ½ teaspoon dried, optional
- 1½ teaspoons fresh thyme leaves OR ½ teaspoon dried, optional
- Vegetables and herbs for decorating, optional
- ½ teaspoon flaky sea salt
Instructions
- Put the flour, instant yeast, salt (not the flaky sea salt), and herbs (if using) into a large bowl (make sure the yeast and salt aren't touching!)
- If using active dry yeast, place in a bowl with the honey and lukewarm water, stir, and let sit until very bubbly, 5-10 minutes
- In a glass measuring cup or drinking glass, stir together the lukewarm water, 2 tablespoons of olive oil, and the honey (if you used active dry yeast, stir the olive oil into the bubbly yeast mixture)
- Mix the dry ingredients together, then pour in the wet ingredients and mix together with your hand until no dry flour remains
- Cover the bowl tightly with plastic wrap, making sure there's enough room for the dough to double in size
- Microwave a mug of water for 2 minutes, then push the mug to the back of the microwave, put the covered bowl of dough in with it, and close the door (if you don't have a microwave, put the bowl in a cozy place, away from drafts, with a tea towel over the plastic wrap)
- Let the dough rise until doubled in size, 45-60 minutes (I like to reheat the water for 90 seconds midway through, removing the bowl of dough first)
- Once the dough has doubled, preheat the oven to 375°F with a rack in the middle position, and spread 1½ tablespoons of olive oil around the bottom of an 8- or 9-inch round or square metal pan
- Put the dough into the pan and gently stretch it out until it covers the entire bottom, letting it rest for a few minutes with some plastic wrap on top if it's springing back
- Cover the pan with plastic wrap, heat the mug of water back up, and let the dough rise in the microwave again for another 30 minutes
- Spread a little olive oil onto your fingertips and make dimples all over the dough, pressing down almost to the bottom of the pan (but don't make any holes all the way through!)
- Pour 1 tablespoon of olive oil over the dimpled dough, and gently spread it around with your fingers or a pastry brush so that all of the dough is covered
- If you're going to put any vegetable or herb decorations on top, this is the time! Dab the pieces with olive oil so that they don't burn
- Bake on the middle rack for about 25 minutes, until the top is a golden color and sounds hollow when you tap it in the middle
- Remove the pan from the oven, pour on another tablespoon of olive oil, sprinkle the flaked sea salt on top, and put the pan on a wire cooling rack; as soon as you're able, remove the focaccia from the pan and serve, or cool completely
- Store cooled focaccia at room temperature in an airtight container or bag for up to 3 days, placing a couple of paper towels in with the bread to absorb extra moisture