Is The Foodie App Better Than Your Phone's Camera?
This post may contain affiliate links and/or codes. You won't pay anything extra, but I might make a commission.
Latest Post: How to Be a Good Dinner Party Guest
Last week I was at an event that involved a lot of food, and a friend told me about the Foodie App. She'd heard about it from my web designer, Kim. Since I was about to take a lot of food pictures, I downloaded it right away. But after messing around with it for a few minutes, I decided that it wasn't all that intuitive. I switched back my phone's camera control and vowed to figure it out later.
The app would definitely benefit from a simple tutorial, because it took a lot of messing around just to figure out what the few icons meant. But I did eventually figure out pretty much all of the features.
Top
To take a picture, you press the black button. You can press the little three-color icon and put one of the filters on, or you can just take the picture and play around with the filters later.

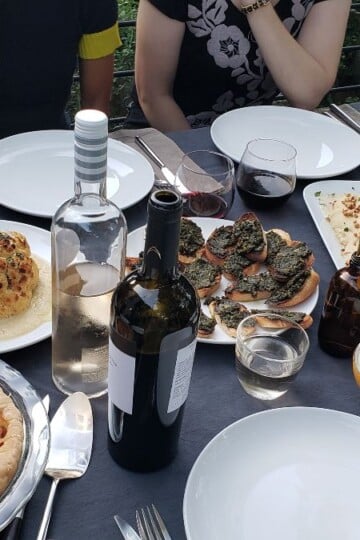
If you're taking an overhead shot, the borders of the picture will turn yellow, and the black shutter button will turn white and say "TOP." This is a very handy feature that takes the guess work out of getting those great "flat" shots.

Video
You can hold down the shutter button to take video. Once the video starts, you don't have to hold the button down like on Instagram.
Camera Swap
The little circle in the top right of the screen switches between front and back cameras.
Aspect Ratio
The square to the left of the camera swap circle switches the aspect ratio of your picture between square (1:1) and rectangular (4:3). Those are the only two choices, and the in-app editor doesn't let you crop your image. So unless you want to edit it outside of the app, make sure your image is framed how you want it to look. (I cropped the images in this post using another program, so that I could do side-by-side comparisons; similar cropping would be very easy to do in Instagram before sharing an image).
Flash
To the left of Aspect Ratio is the flash. Pretty straightforward, you can turn it off or on.
Autoblur
The icon on the top left that looks like a teardrop gave me the most trouble. It took me a long time to figure it out. It turns the autoblur feature off and on. Turning it on is supposed to differentiate between the food in the foreground and everything else in the background.
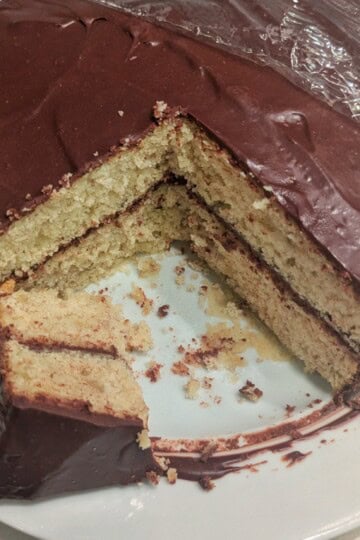
I took this picture with autoblur on, and at first I thought it looked good. But then I realized that only the center of the grilled cheese was sharp. The edges were blurred.

The autoblur feature doesn't seem to pick out the food, it really just blurs everything not in the center of the frame. Which is fine, as long as you know that and don't put the camera too close to what you want to be in focus.
The effect worked much better on these strawberries. The image on the left was taken with my phone's camera control, and the one on the right with the Foodie app, autoblur on.

You can see on the left that the strawberries in the bowl are more in focus than in the bowl on the right. It's a nice effect, making the food in the foreground pop.
Editing
Once you've taken a picture, you can press the circle on the bottom left that looks like a fork and a knife. This will take you not only to your Foodie App pictures, but all of the pictures on your phone if you choose. Once you've chosen a picture, the trash can will delete the picture, the magic wand will bring you to the editing options, and the square with the arrow will share your picture.

Press on the little three-color icon on the bottom left and you can scroll through all of the filters, seeing how they look on your image. The middle icon, which looks like the sun, seems to affect the intensity of the color (the saturation, I guess it would be called). And the teardrop on the right takes you to controls that I assume make the blur effect more or less intense, but honestly it was hard to tell the difference. I didn't find these controls anywhere near as useful as the filters.

That's pretty much it for editing. If you want to do anything fancy, you'll have to do it in another app. But the beauty of the Foodie app is that as long as you compose your picture carefully, you don't really need to do much to the images. For the pictures below, the ones on the left are taken with my phone's camera controls, and the ones on the right with the Foodie App.
For the Foodie App pictures, all I did was use the very first filter, YU1. For the pictures taken with my phone's camera controls, I edited them in the Photoshop Express app, doing what I do for most images: boosting the exposure, temperature, and vibrance a bit.


As you can see, the pictures taken with the Foodie app are just so much better looking! The colors are vibrant, but still look natural. With some practice, I think I could actually get good at this. Someone with a better eye and more experience editing pictures could probably do just as well or better than the Foodie App, but for the rest of us, pressing one button and getting those results is amazing.
Sharing
I found the sharing function to be wonky. The first time I used it it didn't actually post the picture that was supposed to go with my Facebook post. That scared me off from using it again. (It did work fine for me with Twitter and Instagram). Since I don't want to worry that something didn't post, I'll probably continue sharing from my phone's gallery.
Conclusion
When I first started using the app, I didn't think I was going to like it, since I had to struggle to understand it. But the more I used it, the more I fell in love with it. The "TOP" function is fantastic, and the filters get great results in a fraction of the time it takes me to do even simple edits in other programs - and the results with Foodie's filters are so much better than anything I usually do!
The Foodie App is free, and is available for Apple and Android. If we're going to be annoying and take pictures of our food, we might as well make them look good.